-40%
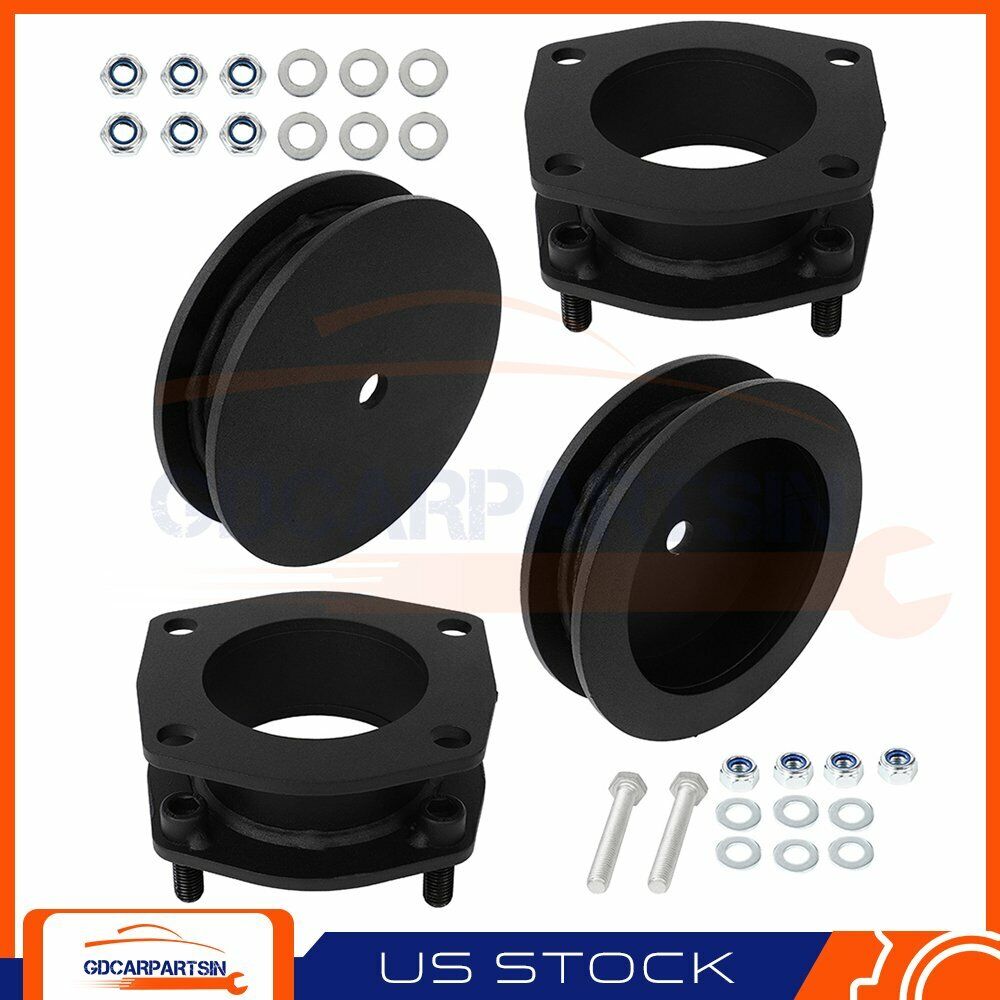
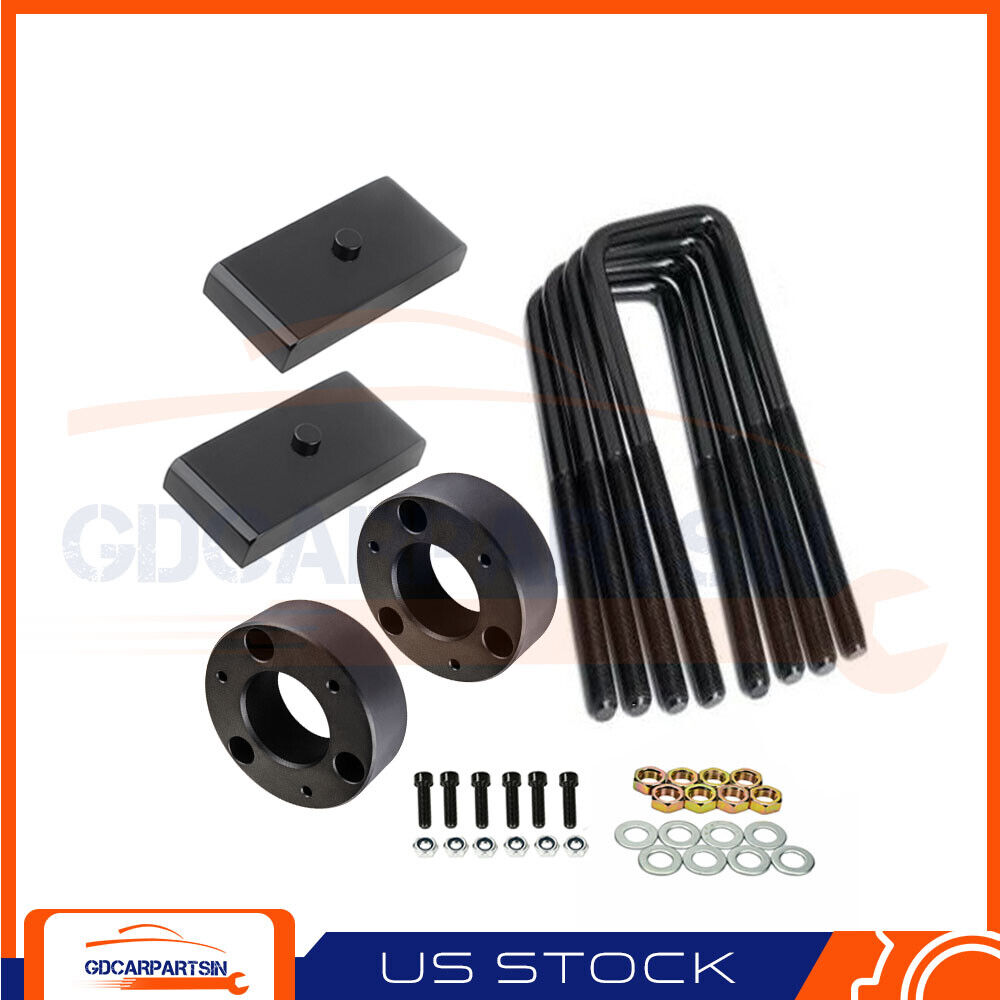
For Jeep Grand Cherokee WK Commander XK 2006-10 2" Front 1.5" Rear Leveling Kit
$ 46.96
- Description
- Size Guide
Description
Front Installation Instruction1. Jack up the front of the vehicle and support the vehicle with jack stands, so that the front wheels are off the ground. Chock rear wheels.
2. Remove the front tires/wheels, using a 19 mm deep well socket.
3. Support the Drivers side lower control arm with a floor jack.
4. Remove the positive wire from the battery terminal.
5. On the driver side remove the rear most box from the mount by releasing the clips from the box as shown in Photo 1. Take care not to damage the clip or the box.
For Jeep Grand Cherokee WK Commander XK 2006-10 2" Front 1.5" Rear Leveling Kit
Front Installation Instruction
1. Jack up the front of the vehicle and support the vehicle with jack stands, so that the front wheels are off the ground. Chock rear wheels.
2. Remove the front tires/wheels, using a 19 mm deep well socket.
3. Support the Drivers side lower control arm with a floor jack.
4. Remove the positive wire from the battery terminal.
5. On the driver side remove the rear most box from the mount by releasing the clips from the box as shown in Photo 1. Take care not to damage the clip or the box.
6. Carefully fold the box over to access the mount bolts with a 10mm socket /wrench as shown in Photo 2, 3 & 4.
7. Carefully lift the forward fuse box on the driver side of the engine compartment and release the wiring clips. Take care not to damage the clips. See Photo 5.
8. With the floor jack under the lower drivers side lower control ,remove the 4 stock nuts that secure the strut to the upper mount as shown using a 18mm socket/wrench. Retain the hardware for reuse. See Photo 6.
9. Gently lower the floor jack under the front driver side and place it under the passenger side lower control arm of the vehicle.
10. Release the air box clamps that secure the top of the air box to the bottom and remove the hose as shown in Photo 7. Lift the air box out of the air box mount.
11. On the Passenger side remove the washer tank by removing the plastic nut by hand and removing the rear mount bolt using a 8mm socket/ wrench. See Photo 8 & 9.
12. Position washer tank out of the way to allow access to the upper strut bolts.
13. Remove the upper strut nuts using a 18mm socket / wrench. Retain the factory hardware for reuse. Lower the floor jack gently to lower the strut from the mount.
14. Starting on the drivers side remove the wire clip from the strut as shown in Photo 10.
15. Remove the sway bar from the control arm as shown in Photo 11 using a 18mm socket. Retain the hardware for reuse.
16. Remove the tie rod from the knuckle as shown using a 21mm socket/wrench. See Photo 12. Retain hardware.
17. Loosen the upper ball joint nut as shown with a 18mm wrench. Do not totally remove the upper ball joint nut at this time. Using a hammer slightly tap the upper tie rod mount to loosen taper. See Photo 13. Position knuckle to allow for strut removal.
18. Remove the lower strut hardware as shown in Photo 14 using a 24mm socket/wrench and remove the strut from the vehicle.
19. Using a hand grinder or similar tool, grind the unthreaded tip portion of the factory stud to allow clearance on the new upper strut spacer. Take care not to damage the stud threads. See Photo 15.
20. Install the new spacer as shown with factory hardware using a 18mm wrench. A strut compressor will ease the re-installation of the strut assembly. It will be necessary to start all 4 of the stock nuts before totally tightening the spacer to the strut.
21. Reinstall the strut and spacer assembly back in the factory upper strut mount using the supplied 12mm flange nuts. Do not tighten at this time. See Photo 16.
22. Swing the lower control arm up and reinstall the lower strut mount in the stock location on the lower control arm using the factory hardware. Tighten with a 24mm socket/wrench. Tighten upper strut mount using 18mm socket/ wrench. See Photo 17.
23. Jack up the lower control arm and reinstall the knuckle to the upper ball joint with stock hardware using a 18mm wrench. See Photo 18.
24. Reinstall the tie rod to the knuckle with factory hardware using a 21mm socket / wrench. See Photo 19.
25. Repeat process for the passenger side.
26. Reattach the sway bar to the driver and passenger side lower control arm with the factory hardware and using a 18 socket. See Photo 20.
27. After strut spacer installation has been completed, Reinstall the washer fluid tank and air box on the passenger side with the factory hardware using a 8mm socket / wrench.
28. Reinstall the electrical boxes on the driver side with factory hardware using a 10mm wrench / socket.
29. Reinstall the tires/ wheels.
30. Jack up the vehicle and remove the jack stands,.
31. Lower the vehicle to the ground.
Rear Installation Instructions
1. Jack up the rear of the vehicle and support the vehicle with jack stands, so that the rear wheels are off the ground. Chock front wheels.
2. Remove the rear tires/wheels, using a 19mm deep well socket.
3. Support the rear axle with a floor jack.
4. Remove the shock from the rear lower mount as shown in
Photo 1
using a 15mm socket/ wrench.
5. Remove the bolt from the upper sway bar mount on the frame using a 18mm socket / wrench as shown in
Photo 2
.
6. Lower the rear end with the floor jack and remove the coil spring. See
Photo 3
.
7. Remove the stock upper coil isolator and retain for reuse. See
Photo 4
.
8. Remove the bump stop as shown in
Photo 5
and remove the bump stop cup from the frame using a 15mm socket.
See
Photo 6
.
9. Install the bump stop bracket on the new spacer as shown with supplied 10mm x 55mm bolt & washers using a
15mm socket. See
Photo 7
. Tighten 10mm bolt to 32ft/lbs. Do not over-tighten bolt.
10. Reinstall the factory bump stop in the bump stop cup and coil spring as shown in
Photo 8
in the stock location with
the stock rubber on the top of the coil spring. It may be necessary to remove the upper control arm from the
upper mount to allow the coil to be installed. If needed remove the bolt with a 18mm socket / wrench.
11. If removed, reinstall the upper control arm bolt at this time using a 18mm socket. Raising or lowering the floor jack may be needed to align the control arm to the mount.
12. Reinstall the sway bar link on the frame with factory hardware using a 18mm socket / wrench.
13. Reinstall the lower shock in the lower shock mount with the factory hardware using a 15mm socket / wrench.
14. Reinstall the tires & wheels.
15. Jack up the rear of the vehicle and remove the jack stands.
16. Lower the vehicle to the ground.
Item Specifics
Brand
GDcarpartsin
Manufacturer Part Number
GD835906CAR
Placement on Vehicle
Left
Kit Parts Included
Strut Spacer
Included Hardware
Mounting Hardware
Lift Height
2" Front & 1.5" Rear
Thickness (Front)
50mm
Thickness (Rear)
33mm
Warranty
1 Year
OE Spec or Performance/Custom
Performance/Custom
Adjustable
No
Interchange Part Number
Jeep Commander XK 2006-2010; Jeep Grand Cherokee WK 2005-2010
Condition
New
Kit or Single Part
Kit
Ship from
Ontario, California
Color
Black
Other Part Number
Lift Front 2 inch; Rear 1.5 inch
Type
Strut Spacers
Part Type
Suspension Lift Kit
Fitment Type
Direct Replacement
Custom Bundle
No
Modified Item
No
Greasable or Sealed
Sealed
Shipping
1. Orders processed within 24 hours of payment verification.(if you want cancel orders or change address pls contact us within 6 hours after payment,or we are not responsible for shipping a replacement.)
2. We only ship to confirmed PAYPAL addresses. Your PAYPAL address must match your Shipping address.
3. Fast shipping:All our packages use USPS First Class/UPS/Fedex... Package Service
4. If you have not received your shipment within 15 days from payment , please contact!
Return
1. You have 30 days to contact us and 10 days to return it from the date it was received. If this item is in your possession more than 7 days, it is considered used and we will not issue you a refund or replacement. There are NO EXCEPTIONS!
2. All returned items must be in the original packaging and you must provide us with the shipping tracking number, specific reason for the return, and item custom lable.
3. We will refund your full winning bid amount, upon receipt of the item in its original condition and packaging with all components and accessories included, AFTER both Buyer and Seller cancel the transaction from eBay. OR, you may choose to have a replacement.
4. Return shipping is to be paid by the Buyer
Feedback
We strive for 100% customer satisfaction! FEEDBACK IS VERY IMPORTANT TO US.
We request that you contact us immediately BEFORE you give us neutral or negative feedback, so that we can satisfactorily address your concerns.
Payment
1.We only accept PayPal.
2.Please do not use the PayPal note field to indicate us to ship to other address. The note there will NOT be read. If you want to change the shipping address, please contact us by eBay messages.
3.(if you want cancel orders or change address pls contact us within 6 hours after payment,or we are not responsible for shipping a replacement.)
4.Payment must be received within 10 days as auction ended or order might be delayed.
Warranty
1,We stand behind every product we sell.
2,All of our brand new items come with a 60-Days money-back guarantee.
3,We define the item as defective only if it doesn't function as described.
4,It is the buyer's responsibility to understand the item description before bidding.
5,We will replace the defective items, provided that they are in stock within the warranty period posted with the listing and the buyer return the original item and pay for the S&H cost for the replacement.
6,We will refund the purchase price if the replacement is not available or buyer prefers a refund and send the original item back at his/her own cost.
7,Shipping & handling cost are not refundable.
8,Man-made damage by abuse or wrong operation is not covered by this warranty.
9,No product liability insurance is assumed.
Shop Category
Store Home
Mirror Parts
◈ Vehicle Mirrors
◈ Truck Mirrors
◈ Mirror Glasses & Other Parts
Brake Parts
◈ Brake Rotors
◈ Brake Pads
◈ Brake Rotors + Pads
Mass Air Flow Sensors
Oxygen Sensors
Cooling Parts
◈ Radiators
◈ Radiator Hoses
◈ Cooling Fans
◈ Fan Clutches
◈ Intercoolers
AC Condensers
Heater Cores
Evaporators
Wheel Hub Bearings
Wheel Spacers
Leveling Lift Kits
Wheel Lug Nuts
Knock Sensors
Fuel Cell Tanks
Jack Stands
A/C Expansion Valves
Air Cleaner Filter Boxes
Clutch Slave Cylinders
Steering U-Joints
Steering Shafts
suspension kit
◈ cj
Idle Air Control Valve
4 pcs wheel hub bearing
Fender Flares
ABS Speed Sensor
Vehicle Speed Sensor
Cargo Cover
Pillar Posts
Polisher
Fuse Holder Box
Radiator Support
Drop Spindle Lowering Kit
Tonneau Cover
Wheel Hub Bearing Knuckle
Bug Shield
Window Visor
Roof Rack
Engine Timing Chain Kit
Engine Timing Belt Kit
Engine Repair Kit
Other
Hot Item
(4) 2" Hubcentric 6x5.5 Wheel Spacers Fits Toyota 4Runner Tacoma Tundra Sequoia
USD 117.24
(4) 2" Hubcentric Wheel Spacers 6x5.5 Fits Chevy Silverado Tahoe GMC Sierra 1500
USD 120.99
Pair Side Mirrors For 2015-2020 Ford F-150 Black Power Heated Turn Signal Light
USD 152.95
(4) 2" Hubcentric Wheel Spacers 5x5 Fits Jeep Wrangler JK Jeep Grand Cherokee
USD 99.99
(4) 1.5" Hubcentric Wheel Spacers 6x5.5 Fits Toyota 4Runner Tacoma FJ Cruiser
USD 90.32
Delivery
New List Item
Mirror Glass Upper Flat Replacement Fits 2008-2017 Toyota Sequoia Driver Side
USD 15.90
Fits Toyota Tacoma 4WD 2005-2020 2" Front & 3" Rear Leveling Lift Kit Diff Drop
USD 81.56
Upstream & Downstream Oxygen O2 02 Sensor For 2004-2005 Porsche 911 3.6L H6 DOHC
USD 50.31
Oxygen 02 O2 Sensor for 1995-1998 Toyota T100 Tacoma 3.4L Downstream Post
USD 17.32
Fits 22690AA43A Oxygen Sensor For 1999-2004 Subaru Legacy 2.5L Civic downstream
USD 16.04
Help & Info
Payment Policy
Shipping Policy
Return Policy
FAQ
About Us
For Jeep Grand Cherokee WK Commander XK 2006-10 2" Front 1.5" Rear Leveling Kit
Front Installation Instruction
1. Jack up the front of the vehicle and support the vehicle with jack stands, so that the front wheels are off the ground. Chock rear wheels.
2. Remove the front tires/wheels, using a 19 mm deep well socket.
3. Support the Drivers side lower control arm with a floor jack.
4. Remove the positive wire from the battery terminal.
5. On the driver side remove the rear most box from the mount by releasing the clips from the box as shown in Photo 1. Take care not to damage the clip or the box.
6. Carefully fold the box over to access the mount bolts with a 10mm socket /wrench as shown in Photo 2, 3 & 4.
7. Carefully lift the forward fuse box on the driver side of the engine compartment and release the wiring clips. Take care not to damage the clips. See Photo 5.
8. With the floor jack under the lower drivers side lower control ,remove the 4 stock nuts that secure the strut to the upper mount as shown using a 18mm socket/wrench. Retain the hardware for reuse. See Photo 6.
9. Gently lower the floor jack under the front driver side and place it under the passenger side lower control arm of the vehicle.
10. Release the air box clamps that secure the top of the air box to the bottom and remove the hose as shown in Photo 7. Lift the air box out of the air box mount.
11. On the Passenger side remove the washer tank by removing the plastic nut by hand and removing the rear mount bolt using a 8mm socket/ wrench. See Photo 8 & 9.
12. Position washer tank out of the way to allow access to the upper strut bolts.
13. Remove the upper strut nuts using a 18mm socket / wrench. Retain the factory hardware for reuse. Lower the floor jack gently to lower the strut from the mount.
14. Starting on the drivers side remove the wire clip from the strut as shown in Photo 10.
15. Remove the sway bar from the control arm as shown in Photo 11 using a 18mm socket. Retain the hardware for reuse.
16. Remove the tie rod from the knuckle as shown using a 21mm socket/wrench. See Photo 12. Retain hardware.
17. Loosen the upper ball joint nut as shown with a 18mm wrench. Do not totally remove the upper ball joint nut at this time. Using a hammer slightly tap the upper tie rod mount to loosen taper. See Photo 13. Position knuckle to allow for strut removal.
18. Remove the lower strut hardware as shown in Photo 14 using a 24mm socket/wrench and remove the strut from the vehicle.
19. Using a hand grinder or similar tool, grind the unthreaded tip portion of the factory stud to allow clearance on the new upper strut spacer. Take care not to damage the stud threads. See Photo 15.
20. Install the new spacer as shown with factory hardware using a 18mm wrench. A strut compressor will ease the re-installation of the strut assembly. It will be necessary to start all 4 of the stock nuts before totally tightening the spacer to the strut.
21. Reinstall the strut and spacer assembly back in the factory upper strut mount using the supplied 12mm flange nuts. Do not tighten at this time. See Photo 16.
22. Swing the lower control arm up and reinstall the lower strut mount in the stock location on the lower control arm using the factory hardware. Tighten with a 24mm socket/wrench. Tighten upper strut mount using 18mm socket/ wrench. See Photo 17.
23. Jack up the lower control arm and reinstall the knuckle to the upper ball joint with stock hardware using a 18mm wrench. See Photo 18.
24. Reinstall the tie rod to the knuckle with factory hardware using a 21mm socket / wrench. See Photo 19.
25. Repeat process for the passenger side.
26. Reattach the sway bar to the driver and passenger side lower control arm with the factory hardware and using a 18 socket. See Photo 20.
27. After strut spacer installation has been completed, Reinstall the washer fluid tank and air box on the passenger side with the factory hardware using a 8mm socket / wrench.
28. Reinstall the electrical boxes on the driver side with factory hardware using a 10mm wrench / socket.
29. Reinstall the tires/ wheels.
30. Jack up the vehicle and remove the jack stands,.
31. Lower the vehicle to the ground.
Rear Installation Instructions
1. Jack up the rear of the vehicle and support the vehicle with jack stands, so that the rear wheels are off the ground. Chock front wheels.
2. Remove the rear tires/wheels, using a 19mm deep well socket.
3. Support the rear axle with a floor jack.
4. Remove the shock from the rear lower mount as shown in
Photo 1
using a 15mm socket/ wrench.
5. Remove the bolt from the upper sway bar mount on the frame using a 18mm socket / wrench as shown in
Photo 2
.
6. Lower the rear end with the floor jack and remove the coil spring. See
Photo 3
.
7. Remove the stock upper coil isolator and retain for reuse. See
Photo 4
.
8. Remove the bump stop as shown in
Photo 5
and remove the bump stop cup from the frame using a 15mm socket.
See
Photo 6
.
9. Install the bump stop bracket on the new spacer as shown with supplied 10mm x 55mm bolt & washers using a
15mm socket. See
Photo 7
. Tighten 10mm bolt to 32ft/lbs. Do not over-tighten bolt.
10. Reinstall the factory bump stop in the bump stop cup and coil spring as shown in
Photo 8
in the stock location with
the stock rubber on the top of the coil spring. It may be necessary to remove the upper control arm from the
upper mount to allow the coil to be installed. If needed remove the bolt with a 18mm socket / wrench.
11. If removed, reinstall the upper control arm bolt at this time using a 18mm socket. Raising or lowering the floor jack may be needed to align the control arm to the mount.
12. Reinstall the sway bar link on the frame with factory hardware using a 18mm socket / wrench.
13. Reinstall the lower shock in the lower shock mount with the factory hardware using a 15mm socket / wrench.
14. Reinstall the tires & wheels.
15. Jack up the rear of the vehicle and remove the jack stands.
16. Lower the vehicle to the ground.
Item Specifics
Brand :
GDcarpartsin
Manufacturer Part Number :
GD835906CAR
Placement on Vehicle :
Left
Kit Parts Included :
Strut Spacer
Included Hardware :
Mounting Hardware
Lift Height :
2" Front & 1.5" Rear
Thickness (Front) :
50mm
Thickness (Rear) :
33mm
Warranty :
1 Year
OE Spec or Performance/Custom :
Performance/Custom
Adjustable :
No
Interchange Part Number :
Jeep Commander XK 2006-2010; Jeep Grand Cherokee WK 2005-2010
Condition :
New
Kit or Single Part :
Kit
Ship from :
Ontario, California
Color :
Black
Other Part Number :
Lift Front 2 inch; Rear 1.5 inch
Type :
Strut Spacers
Part Type :
Suspension Lift Kit
Fitment Type :
Direct Replacement
Custom Bundle :
No
Modified Item :
No
Greasable or Sealed :
Sealed
Shipping
Return
Feedback
Payment
Warranty
1. Orders processed within 24 hours of payment verification.(if you want cancel orders or change address pls contact us within 6 hours after payment,or we are not responsible for shipping a replacement.)
2. We only ship to confirmed PAYPAL addresses. Your PAYPAL address must match your Shipping address.
3. Fast shipping:All our packages use USPS First Class/UPS/Fedex... Package Service
4. If you have not received your shipment within 15 days from payment , please contact!
1. You have 30 days to contact us and 10 days to return it from the date it was received. If this item is in your possession more than 7 days, it is considered used and we will not issue you a refund or replacement. There are NO EXCEPTIONS!
2. All returned items must be in the original packaging and you must provide us with the shipping tracking number, specific reason for the return, and item custom lable.
3. We will refund your full winning bid amount, upon receipt of the item in its original condition and packaging with all components and accessories included, AFTER both Buyer and Seller cancel the transaction from eBay. OR, you may choose to have a replacement.
4. Return shipping is to be paid by the Buyer
We strive for 100% customer satisfaction! FEEDBACK IS VERY IMPORTANT TO US.
We request that you contact us immediately BEFORE you give us neutral or negative feedback, so that we can satisfactorily address your concerns.
1.We only accept PayPal.
2.Please do not use the PayPal note field to indicate us to ship to other address. The note there will NOT be read. If you want to change the shipping address, please contact us by eBay messages.
3.(if you want cancel orders or change address pls contact us within 6 hours after payment,or we are not responsible for shipping a replacement.)
4.Payment must be received within 10 days as auction ended or order might be delayed.
1,We stand behind every product we sell.
2,All of our brand new items come with a 60-Days money-back guarantee.
3,We define the item as defective only if it doesn't function as described.
4,It is the buyer's responsibility to understand the item description before bidding.
5,We will replace the defective items, provided that they are in stock within the warranty period posted with the listing and the buyer return the original item and pay for the S&H cost for the replacement.
6,We will refund the purchase price if the replacement is not available or buyer prefers a refund and send the original item back at his/her own cost.
7,Shipping & handling cost are not refundable.
8,Man-made damage by abuse or wrong operation is not covered by this warranty.
9,No product liability insurance is assumed.
All rights reserved.
